
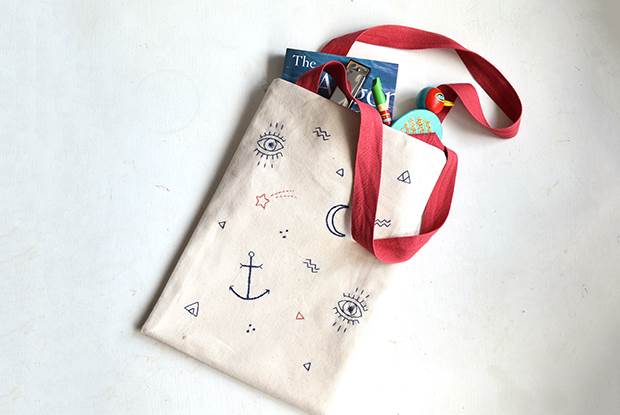
frankie exclusive diy: tattoo-inspired embroidered tote bag
We show you how to whip up this sweet-as-can-be tote bag, emblazoned with charming embroidered tats.
I like telling people that my brother is a tattooist because I think it makes me seem cooler and ‘edgier’ than I am. He uses the traditional technique of hand-poking, so no whirring machine noise – cool, right?! Anyway, I’ve often thought about the similarities between tattooing and sewing, and particularly how many tattoo designs would make perfect embroidery patterns, what with their linear style and use of sharp contrasts. So this is my take on some tattoo-inspired embroidery! Whether you’ve run out of space for any more ink on your body, or you’re feeling a bit shaky about the idea of something permanent, this little tote bag is the perfect place to channel all those tattoo ideas you’ve been eyeing up on Pinterest! You can use the template provided or design your own tattoo-inspired stitching.
MATERIALS:
3/4m lightweight cotton canvas
1.5m webbing (2.5cm wide) (I’ve chosen a brick-red colour)
thread to match your canvas
embroidery cotton in navy blue
embroidery cotton to match your webbing
embroidery needle
small embroidery hoop (mine’s about 10cm across)
sewing machine
scissors
ruler/tape-measure
tailor’s chalk
tape (washi tape works well)
pencil (a soft pencil like a 2B works best, but any old pencil will work)
biro
sheet of A4 layout paper (or plain printer paper)
pins
INSTRUCTIONS:
1. Start by printing out your design. Ideally use layout paper as this is a bit transparent. (If you don’t have layout paper just use regular printer paper). Turn your paper over, face-down. With the edge of your pencil nib, create a layer of pencil shading on the back of where your designs are (this is where the layout paper is handy, but if you can’t see your designs, just do this all over the back of your paper).

2. Next: prepare your outer fabric. With your tailor’s chalk, mark out a 24cm x 66cm rectangle on your canvas. Cut out with a 3cm seam allowance (this may seem excessive, but it’s to allow room for your embroidery ring near the edges). Fold the rectangle in half so the shorter edges meet at the top and press. Now lay your piece of paper on top of your folded fabric (‘pencilled’ side down) about 1cm from the bottom folded edge and equal distance from the right and left edges. Tape in place. With a Biro or a sharp pencil draw carefully but firmly over your embroidery patterns. The pencil on the back of your paper will transfer to the fabric like magic!

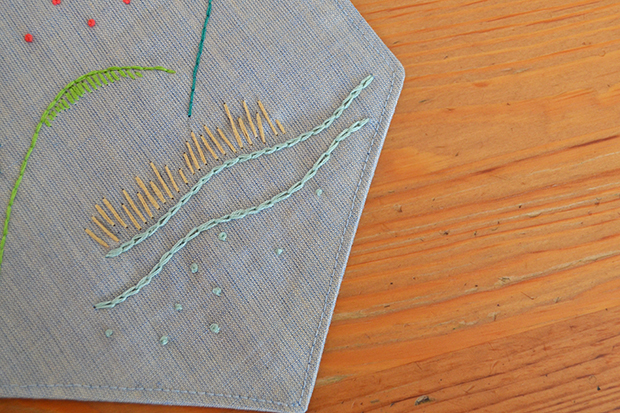
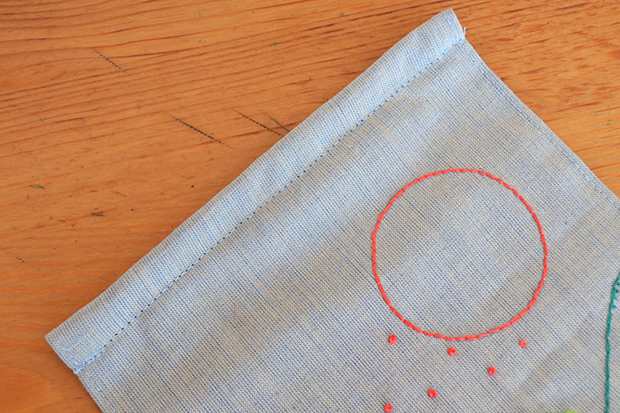
3. Remove your paper when you’re done and unfold your fabric, laying it out flat. Place the inner ring of your embroidery hoop below an area of your transferred pattern and press the outer ring over the fabric to stretch it taught. Tighten your ring if needed and make sure the fabric is taught. Thread your needle with embroidery cotton (I like to use two strands at a time). Tie a knot at the end of your thread and start sewing! You can use a simple straight stitch, or mix things up with any stitches you think work for your designs. I’ve used mostly straight stitch, but with a chain stitch for the anchor and moon to give them a bit more body, and some little French knots for the dots. Move your hoop around to complete your embroidery in sections. When you’re all done, remove the hoop and give your fabric a good press on the back. (Tip: YouTube tutorials are great for brushing up on how to make different embroidery stitches.)

4. It’s time to assemble your bag! Start by trimming your seams on your embroidered piece to 1cm and laying it out face-up. Along both of the shorter edges, measure and mark 4.5cm in from the sides. Cut two 60cm lengths of your webbing. Take one length of webbing and form a handle by pinning the ends so their outer edges line up with the marks you made and their cut ends overlap the short edge of your fabric by 1cm. Repeat at the other short edge. (Make sure your handles aren’t twisted).

5. Now take your remaining fabric. Measure and cut another rectangle 24cm x 66cm with a 1cm seam allowance. Lay this face-down on top of your embroidered piece, lining up all the edges, and pin along the short edges (remove the pins from the handles as you go and re-pin through all the layers). Sew along the short edges, 1cm in. Add some zig-zag stitching over the ends of the handles to secure.
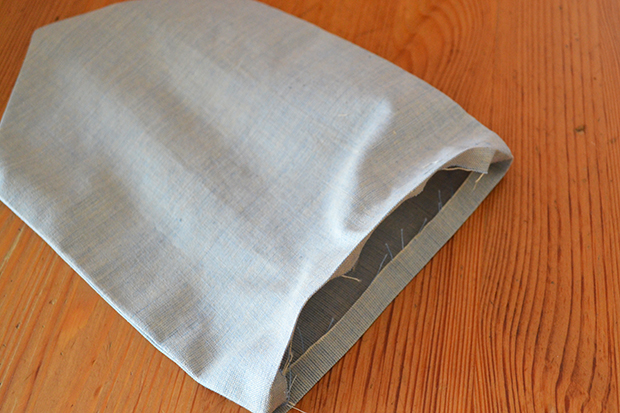
6. Lay your fabric out again, but this time line up the seams you’ve just sewn so that one is directly on top of the other. Match the seams up exactly and pin along the long edges. Sew along both long edges, 1cm in, leaving a 5cm opening on one side. Make sure the opening is on the non-embroidered piece of fabric as this will be the lining.
7. Turn your bag right way out through the opening. Sew the opening closed (you can do this by machine as it will be hidden inside, or if you want to be super-neat, by hand). Tuck your lining into your embroidered outer, give your bag a press and away you go!
Pop over this way to see more nice stuff from Anna.


.jpg&q=80&w=316&c=1&s=1)


