frankie exclusive diy: stitch your own yay pillows
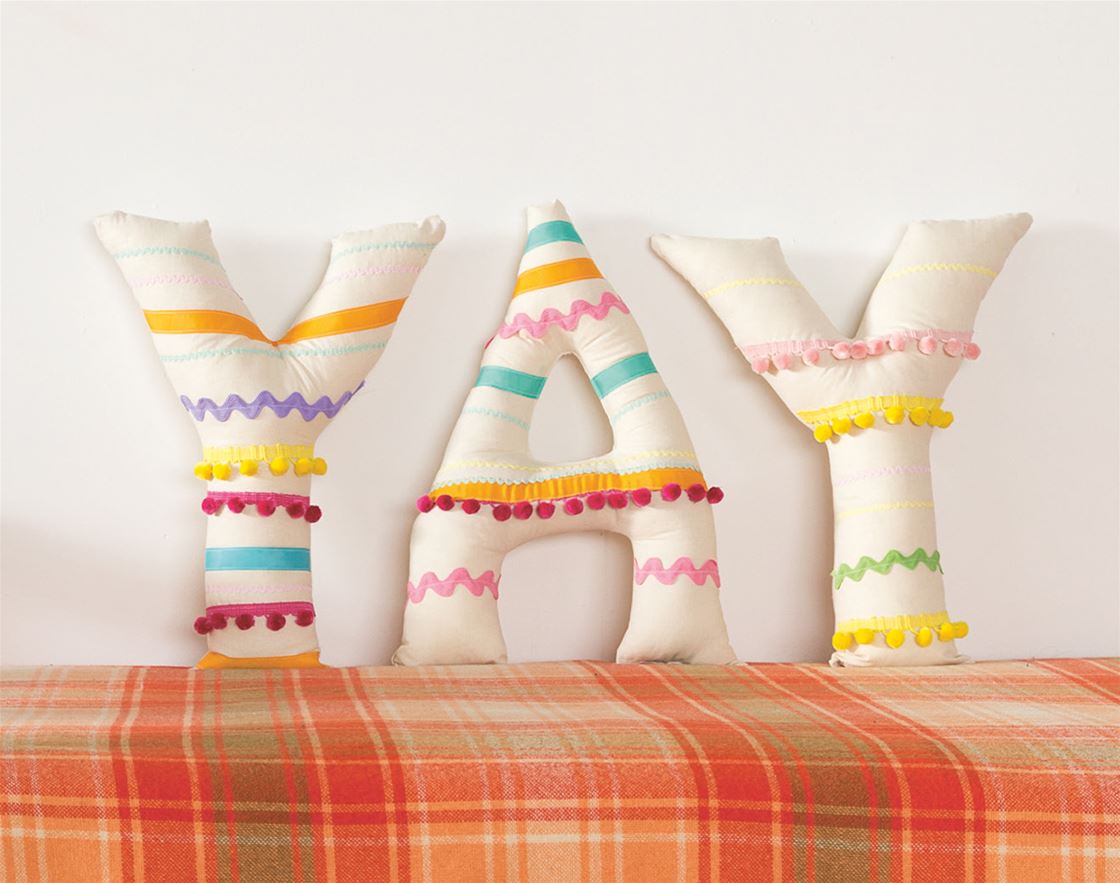
Make yourself a set of cheerful and supportive pillows that will act as a visual high-five every time you’re near.
MATERIALS
2m x 1.5m of calico
a roll of brown or white paper or newspaper to make your ‘pattern’
pins
scissors
2m of various pretty trims
needle and thread to match fabric
1 large bag of toy stuffing or some repurposed stuffing from an old cushion or pillow
sewing machine and thread to match fabric
OPTIONAL
sequins, beads and other fancy things to sew on
HOW TO
First up, fold your calico in half so there are two layers. You want the long, 2m bit to be the folded edge.
Next you’ll need to draw your letter templates onto the paper. For this project you’ll obviously need a Y and an A! (Feel free to make up your own words, though: wow, rad and ace could work well. Or fan-dabby- tastic for those with time on their hands.)
Your letters need to be about 3cm larger all the way around than your desired end result. Choose an angular typeface if you like, or channel your primary school bubble writing. Keep in mind they also need to fit onto the folded-up fabric, so double-check before you get too happy with the scissors and make any required adjustments to letter size.
Now, pin the paper letters to the two layers of fabric and nicely cut out two Ys and one A.
Pin and sew the trim and embellishments to the front piece of your letters. You can hand-stitch them in matching cotton or machine-sew them in whatever thread you have in your machine. Just go crazy here and do whatever looks nice to you.
Now pin the back of the letters to the front, sandwiching the trims inside and matching all the edges neatly.
Stitch all the way around the Y letters with a 2cm seam allowance, leaving a gap of about 10cm so you can pop in the stuffing. Then stitch around the outside of the A in the same way, leaving a gap again. Don’t stitch the middle ‘hole’ in the A, because if you do, you will have trouble turning it out the right way again.
Turn right side out. See how cute that looks already!
Now you’ll be left with one gap in each letter and the centre of the A still unsewn. Hand-stitch the centre of the A, sewing the front and back together and tucking the raw edges in as you go. (Or machine-stitch the A’s centre and let the raw edges hang out, rustic-style.)
Next, stuff your letters evenly and neatly using the 10cm gap you left. A chopstick or large knitting needle might help with poking the stuffing into awkward bits.
Finally, fold the raw edges under and hand-sew each letter closed. Trim any loose ends, plump up your pillows and cosy up to your very own YAY!
Note: You could make these much bigger or much smaller, too! It all depends on space and how much yay you want in your life.
This cheerful project comes straight from the pages of frankie feel-good. Nab a copy for yourself over here.




.jpg&q=80&w=316&c=1&s=1)


.jpg&q=80&w=316&c=1&s=1)


