frankie exclusive diy: patchwork wall hanging
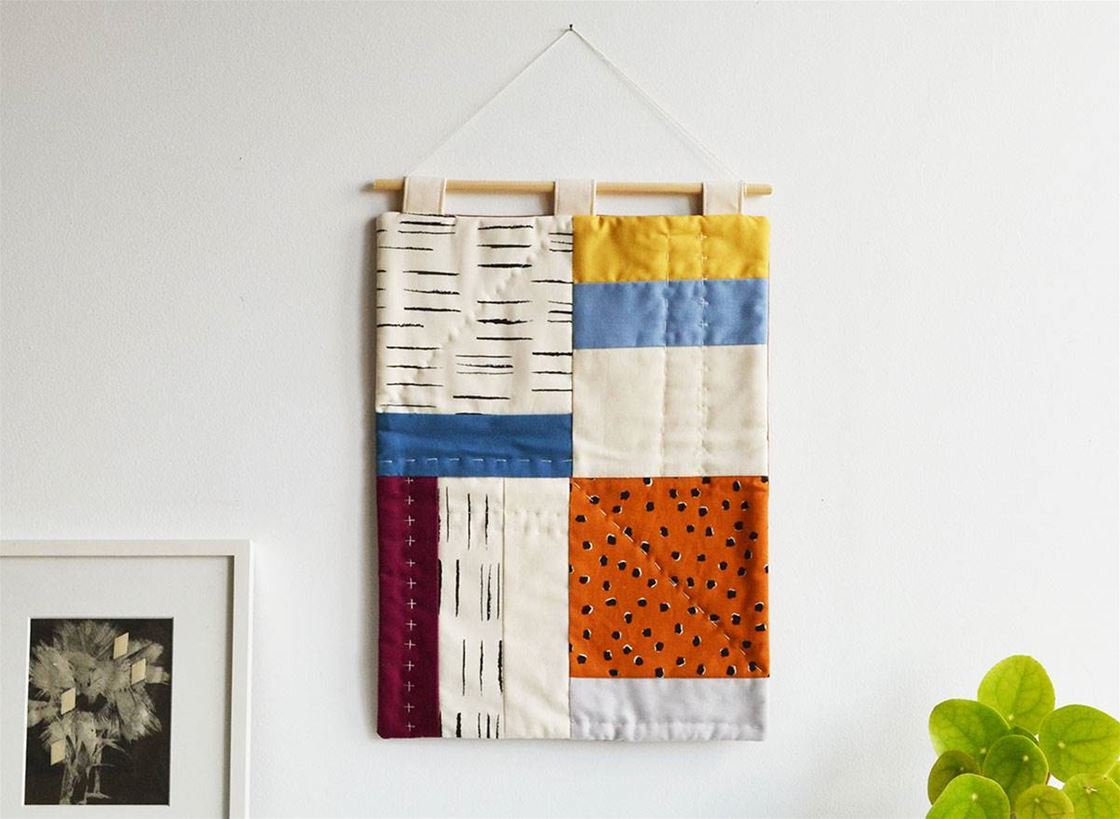
Got a stash of leftover fabrics on hand? Put them to good use by stitching up a patchwork wall hanging – the more colours and patterns you've got, the better.
MATERIALS:
FRONT PANEL
Patterned fabric 1 (spots) 17cm x 17cm
Patterned fabric 2 (lines) 17cm x 17cm
Yellow fabric 17cm (w) x 7cm (h)
Light blue fabric 17cm (w) x 7cm (h)
Grey fabric 17cm (w) x 7cm (h)
Dusky blue fabric 17cm (w) x 7cm (h)
Plum fabric 7cm (w) x 22cm (h)
OTHER
Plain natural fabric approximately 40cm x 30cm
Plain solid coloured fabric for backing (I used a rust coloured canvas, but quilting fabric would work too) at least 32cm (w) x 42cm (h)
Wadding at least 32cm (w) x 42cm (h)
Dowel, 30cm long (approximately 8mm-1cm thick)
Cord, 50cm (approximately 2mm thick)
Neutral coloured thread
Sewing machine and basic sewing kit
METHOD:
1. Cut out all the pieces for your front panel, mentioned in materials list above, plus the two strips below (which will also go on the front panel).
- Plain natural fabric 7cm (w) x 22cm (h)
- Plain natural fabric 17cm (w) x 12cm (h)
Then cut out:
- Plain natural fabric (for tabs to hang your hanging) 12cm x 24cm
- Plain solid colour fabric (for backing) 32cm (w) x 42cm (h)
- Wadding 32cm (w) x 42cm (h) 2. We’ll piece together four rectangles and then sew those together to form the front panel of your hanging. It’s best to start by laying out all your pieces, face-up, as they will appear in the finished wall-hanging (refer to top completed image).
For the first rectangle (this will be top left on the finished panel), take the dusky blue piece and lay it face-down on top of the stripy square, so the bottom edges line up. Pin along that edge and sew with a 1cm seam. Unfold and press.
For the second rectangle (top right), lay your yellow piece on top of your light blue piece, face-to face, pin and sew along one of the long edges, 1cm in. Unfold and lay out with the light blue at the bottom. Lay the natural piece from that section face-down on top so its bottom long edge lines up with the light blue bottom long edge. Pin and sew as before. Unfold and press.
For the third rectangle (bottom right) do the same as you did for the first rectangle, but using your spotty and grey fabrics.
For the fourth rectangle (bottom left) lay the plum piece face-down on top of your stripy piece, pin and sew along one of the long edges. Open out and press. Lay your natural piece from this section on top, face-down, so it lines up with the open long edge of the stripy piece, pin and sew along that edge. Unfold and press. 3. Once your four rectangles are pieced together lay them out in the right placement again. Now take the rectangle on the top right and turn over, laying face down on the one to its left. Pin along the right edge and sew with a 1cm seam. Unfold and press. Do the same with the two rectangles below.
 4. Lay your rectangles out again in the right placement and then turn the bottom row over and place face-down on the top row. Pin along the bottom edge and sew with a 1cm seam. Unfold and press.
 5. Take the strip you cut for the tabs and fold in half so the long edges meet, pressing to crease. Unfold and then fold the long edges in to meet along the centre crease, pressing again. Finally, re-fold again along the centre crease and press. Sew along both long edges of the folded strip. Cut your strip into three equal 8cm length pieces. Fold each a strip in half so the narrow edges meet and press.
 6. Lay out your wadding (portrait position) then place your front panel on top, face-up. Along the top of your panel place one of your tabs 3cm in from each side and one in the centre, with the raw edges lining up with the top edge and the folded edge pointing down. Clip or pin in place.
 7. Lay your back panel on top face-down. Clip or pin all the way around (remove and re-place the clips/pins holding your tabs in place, so they now hold all the layers) and then sew with a 1cm seam, leaving a roughly 6cm gap on one side or bottom edge.
 8. Trim across the corners and turn right way out through the gap you left. Give it a good press and hand-sew the gap closed.
9. Add some hand-stitching to your panel. Use a fairly long needle and double your thread so it's more visible against the fabric. Sew large stitches (about 6-8mm) in a running stitch in diagonals or parallel to the edges of your pieces. You can also turn some of your stitches into crosses by sewing across each vertical stitch. 10. Insert your dowel through the loop tabs at the top. Tie your cord at both ends of your dowel and hang from a small nail.
Anna Alicia is a freelance craft writer, designer, maker and mother based in East London. Anna’s latest craft book (out now with Quadrille Publishing) is all about one of her favourite things to sew –‘Bags’!



.jpg&q=80&w=316&c=1&s=1)


.jpg&q=80&w=316&c=1&s=1)


