
a little bit crafty: pimp my esky
Pretty up any old esky with some pastel loveliness.
Though it might not seem like it in some corners of our great brown land, there are still a few weeks of prime picnicking weather left for the season. To help you celebrate the last hurrah of al fresco sipping, we thought we'd share with you one of our favourite projects from frankie's first craft book, A Little Bit Crafty. Here Kaila Perusco, the clever crafter behind Partito, shows us how to pretty up any old esky with some pastel loveliness. 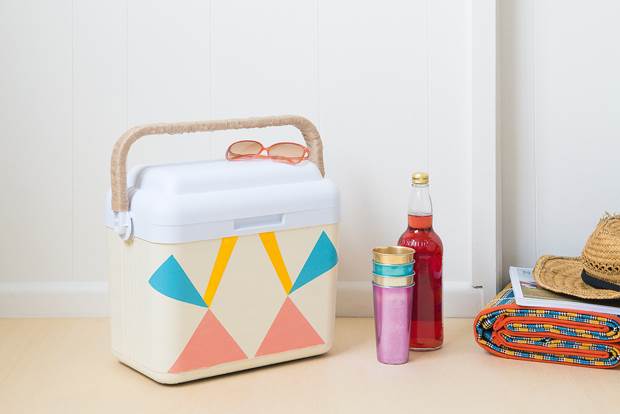
MATERIALS
an old esky
sugar soap or similar cleaning product
newspaper or drop sheet
150ml cream acrylic paint
60ml light pink acrylic paint
60ml pastel blue acrylic paint
60ml mint acrylic paint
paintbrush and jar of water
permanent matte spray
5m rope or ribbon, approx 2cm wide (larger if you have a big esky)
hot glue gun and hot glue gun sticks
two coathangers
ruler or measuring tape
pliers
wire cutters
HOW TO
Rescue the esky from wherever it's been hiding out and give it a good scrub down with sugar soap. Now be patient and let it dry!
Set up a painting area and put a drop sheet or some old newspaper under the esky to protect any other surfaces. Give the esky body two or three coats of cream paint, letting them dry properly between each one.
Once the body is dry, unleash your inner creative and paint something pretty on top using the pastel colours - geometric patterns or even some picnic-inspired motifs. Leave it somewhere safe to dry, then spray completely with the permanent matte sealer.
Next up, pimping the handle. Fire up the hot glue gun and firmly glue the ribbon or rope to the underside of one end of the handle. Now start wrapping the ribbon along the length of the handle, gluing underneath so it stays in place. Keep gluing and wrapping until the handle is completely covered.
The esky will be looking sexy now, but to take it to the next level, you can make some wine glass holders to hang off it. These will hold teh drinks when you're busy doing other picnicky things like playing frisbee or eating brie. Free hands = more fun!
Take one coathanger and use the pliers to unravel the coiled neck. Hang on to the part with the hook on the end, and measure 40cm from here along the wire. Snip through the wire, then create a semi-circle loop that will cradle the glass (test the shape with a glass to make sure it fits). Bring the end back to the nexk and secure firmly by twisting the pieces of wire together. Repeat with the other coathanger and get ready for your next picnic party.
This snazzy DIY is an extract from A Little Bit Crafty, a book of easy-to-make, slightly oddball projects that is available over here.


.jpg&q=80&w=316&c=1&s=1)


