pizza slice pinata diy
Next time you have a pizza party, why not make the decorations match the menu?
Next time you have a pizza party, why not make the decorations match the menu? You don't need to be a gourmet cook to make this tasty slice, just follow our recipe for the most delicious paper-crafted snack ever. Fill it with goodies (Gummi pizzas, perhaps?) and voila! Delicious good times for all.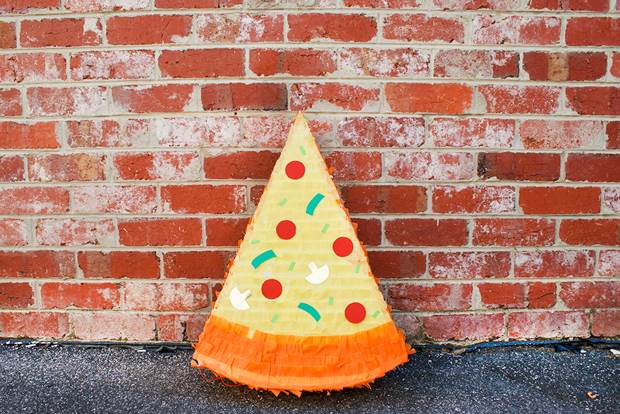
MATERIALS
3-4 large pieces of plain cardstock
1 packet orange crepe paper
1 packet yellow crepe paper
coloured card for pizza toppings (we used red, green, light green and gold)
double-sided tape
sticky tape
pencil
scissors
string for hanging
INSTRUCTIONS
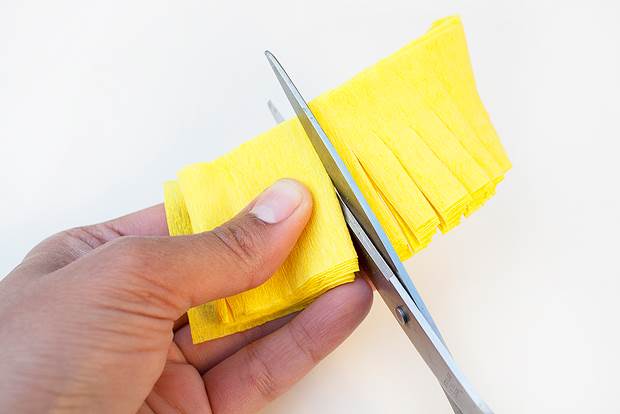
1. To create the crepe paper fringe, first cut the roll of crepe paper into 4cm segments (cut across the roll, from long edge to long edge). Take a segment and find the middle. Cut up the fold lines on either side, but leave 1cm of the fold uncut. Close up the segment and make cuts all the way along one long edge, on the same side as your first cuts on the folds. After cutting, ruffle this edge to separate the fringing and gently unfold.

2. Cut two large triangles from plain cardstock. Our triangle size was approximately 40cm along the short edge and 55cm high.
3. Mark points 4cm along the long sides of the triangle, at the short edge end. You should have the middle point marked along the short edge from creating your triangle. Hand-draw a curved line from the middle point to the points marked on the long sides. This forms the curved "crust" edge of the pizza slice.
4. For the edges of the piñata, measure and cut some long rectangles from the large cardstock pieces, using the entire length of the card piece and marking their width at 14cm. You will probably need around four of these rectangles. Mark a line down both long edges of each rectangle, about 1cm in from the edge. This will form tabs for constructing the pinata.
5. Use the edge of a scissor blade to gently score along the lines you just marked up on each rectangle.
6. Make small cuts (1cm wide approx) along each tab, cutting up to the marked lines only.
7. Affix double-sided tape along the edges of one triangle, on one side only.
8. Starting with the curved crust part, carefully stick a long rectangle card piece to the triangle, ensuring the tabs are folded inwards. When you reach the corner of the triangle, fold the long tabbed rectangle so that it follows the edge of the triangle. When the rectangle of card runs out, overlap another piece and stick it to the first with double-sided tape.
9.Continue sticking the side pieces onto the triangle in this way until you reach the point where you started sticking. Trim any excess cardboard but leave a 3cm gap so you can fill the piñata with goodies later. Affix double-sided tape to the second triangle and carefully stick it on top to complete the piñata structure.

10. Poke a small hole on either side of the gap you left in the piñata and thread string through for hanging.
11. Use normal sticky tape to seal all the edges to make the piñata extra strong.
12. Begin to cover the piñata, starting with the triangle faces. Affix double-sided tape to the top of the fringe. Start at the bottom point of the triangle and work upwards, trimming the fringe to fit the shape of the triangle as you go. Leave a segment uncovered at the top so you can cover it with orange later to form the "crust".
13. Once the triangles have been covered, repeat the process with orange up the sides of the piñata.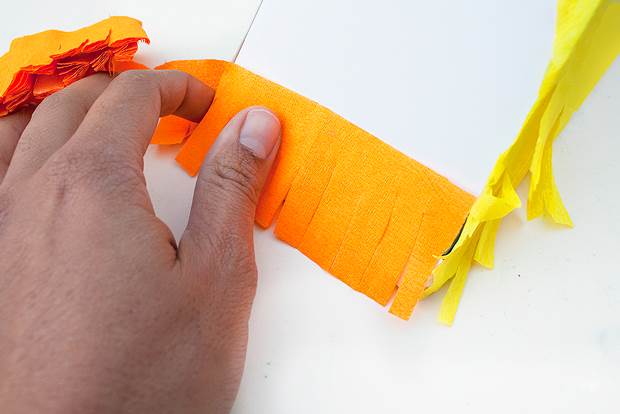
14. After all the sides have been covered, create a crust with orange fringe that follows the curve of the triangle.
15. Cut topping shapes from the coloured card. We made little red tomatoes, green capsicums, light green herbs and gold mushrooms. Decorate both sides of the pizza slice with the topping in any formation you choose! Fill your piñata with goodies and it's ready to go.As an extra tasty tip, you could ecorate your piñata with metallic crepe paper instead for a more glamorous pizza experience. Bon appetit!


.jpg&q=80&w=316&c=1&s=1)


.jpg&q=80&w=316&c=1&s=1)