
a magical unicorn craft-a-thon
Fancy a trio of sweet unicorn-themed craft projects? Well, we've got a few to offer, courtesy of frankie friends Rachel Burke, Evie Barrow and Cat Rabbit.
Created in collaboration with the Art Gallery of New South Wales.
Snaps by Hilary Walker.
Ah, unicorns. Those mystical, four-legged creatures that sport horns on the centre of their foreheads, and poop clouds of fruit-scented glitter. (Or at least, that’s what the internet would suggest.) Technically the flamboyant horses may be fictitious, but that doesn’t mean they can’t trot into your life via a needle and thread, a hunk of clay, or some rainbow-coloured raffia. Read on below for some sweet unicorn-themed crafting, courtesy of frankie friends Rachel Burke, Evie Barrow and Cat Rabbit.
RAINBOW UNICORN JACKET
Words and project by Rachel Burke

MATERIALS:
10 small rainbow raffia skirts (the kind you buy from a cheapy store)
2 metres each of baby pink, baby blue and silver tinsel lametta, cut into 15cm lengths
1 old jacket
sewing machine
scissors
INSTRUCTIONS:
1. Prep your raffia skirts by plucking off any fake flowers, and chopping or unpicking any velcro panels. Meanwhile, cut the sleeves off your jacket and shorten them to t-shirt length.
2. Starting 20cm above the hem of your jacket, and at the edge of the jacket opening, lay down a strip of rainbow raffia and begin sewing it into place around the garment. Keep laying strips down until you reach the other side of the jacket.
3. Trim the tassely bits of raffia to your desired length (mine are approximately 15cm) and use the off-cuts to sew back onto the garment.
4. About 5cm above your sewn-down strip of raffia, stitch on a mix of silver/blue/pink tinsel lengths, all the way around the garment (mirroring the first placement of rainbow raffia). Continue this process of sewing raffia and rainbow tinsel all the way up the jacket, until the whole body, back and collar are covered in rainbow goodness.
5. Apply the same process to the sleeve of the jacket. Beginning at the hem, sew down a rainbow raffia strip all the way around the sleeve, before stitching down the rainbow tinsel. Continue this until each sleeve is completely covered in your materials.
6. Prepare to skip around like a unicorn!
To see more from Rachel, head over this way.
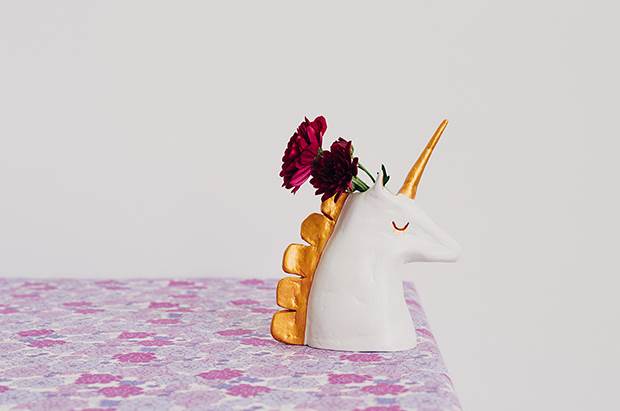
TINY GARDEN POSY HOLDER
Words and project by Evie Barrow
MATERIALS:
white air-dry clay
small dish of water
skewer or toothpick
clay-sculpting tool (a plastic picnic knife or butter knife will do, too!)
x-acto knife
white and gold acrylic paint
paint brushes
Optional:
cool, smooth work surface like a ceramic dinner plate or marble bench
rolling pin (a jar will also do the trick)
super-fine sandpaper
clear varnish for sealing
cake cooling rack/hairdryer (to help dry clay)
INSTRUCTIONS:
1. In the palm of your hand, roll a handful of clay into an oval shape, making one end wider than the other. Flatten the base of the wider end. (A good way to do this is by throwing it against a hard surface a couple of times. Alternatively, cut it flat using an X-acto knife.)
2. Bend the other end of the oval shape at a right angle and shape into a unicorn head (think of it as a simple triangle shape). Use a bit of water and your fingers or clay-sculpting tool to shape and smooth.
3. Using your finger or clay-sculpting tool, make a large enough hole in the top of the head to hold your flower posy. Smooth if necessary with a bit of water.
4. Make the unicorn’s mane. There are two ways you can do this. Number one: using your fingers, pinch the clay down the back of your unicorn and smooth into shape using water, your clay-sculpting tool and the skewer. Number two: roll additional clay to around 5mm thick using a rolling pin or jar. Cut 4 (or more if needed) small half circles. Using the X-acto knife or skewer, score the flat end of the half circles, as well as down the back of your unicorn where you’ll attach the mane. Attach the half circles and secure in place by smoothing around joins with your clay-sculpting tool or skewer. You may also need to use small amounts of extra clay and water to help secure the mane in place.
5. Create ears with additional clay. Pinch and smooth into small triangle shapes while attaching to the sides of the hole on top of your unicorn head.
6. Use the palm of your hand to roll a piece of clay into the shape of a unicorn horn, tapering one end and cutting the other end flat with the X-acto knife. Score the flat end and attach to the front of the hole on top of your unicorn head. Secure and smooth in place as needed with extra clay and water.
7. Use water and tools to smooth off any parts of the unicorn that still require smoothing. Add extra details like nostrils, eyes and body markings with a skewer. Leave your unicorn to dry for 24 to 48 hours. Bonus tip: place the clay on baking paper if leaving on a flat surface, so it won’t stick. If you need to speed up the drying time, place on a cake cooling rack so air can flow underneath your unicorn, pop it near a sunny window or use a hairdryer.
8. Once dry, smooth the surface of your unicorn with super-fine sandpaper (optional). Paint the entire surface with white acrylic paint. You may need to do a couple of coats. (If you used white air-dry, clay it should dry fairly white already, so you may choose to skip this step.) Once the white paint has dried, paint the mane, horn and any other details you like in gold. Leave to dry, then give your unicorn a coat or two of clear varnish to help seal and protect the surface (optional).
9. Pick a tiny, pretty posy from your garden and place it in the crown of your beautiful unicorn!
To see more from Evie, head over this way.
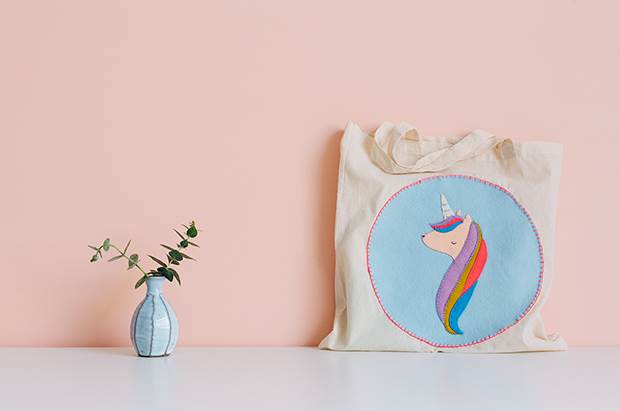
UNICORN TOTE BAG WITH FELT APPLIQUÉ
Words and project by Cat Rabbit
MATERIALS:
blank cotton tote bag
embroidery thread in your chosen colours
air erasable pen
pins
A4 sheets of wool felt in six colours of your choice
A3 sheet of wool felt in your chosen colour (preferably a muted or contrasting colour to your unicorn colours, as this will be the background and you want your unicorn to stand out!)
scissors
needle
dinner plate for tracing (approximately 28cm in diameter, if you’re using the A4 template)
INSTRUCTIONS:
1. Cut out the pattern from this template (depending on the size of your tote bag, you can scale the pattern up or down on a photocopier).
2. Trace your pieces onto the different colours of felt using the air erasable marker. Mark each unicorn hair piece with the corresponding number on the template, so as not to get your pieces muddled.
3. Take the A3 sheet of felt and trace around your dinner plate with the air erasable marker. Carefully cut this circle out (it will form the background of your unicorn).
4. Take the pieces for the face and horn of the unicorn and draw where you would like the eye, nose, cheek and decorative elements of the horn to go.
5. Embroider these elements using a simple straight stitch, back stitch or chain stitch – depending on your embroidery skills. If you want it to look extra fancy, you can freestyle some more lavish embroidery in this step!
6. Your unicorn will be much easier to sew onto the circular piece of felt (the bit you traced with the plate) and then onto the bag later. Starting with the unicorn head, place the piece approximately 1/3 of the way from the top of the circle. Pin in place.
7. Thread your needle with the cotton of your choice and use a simple whip stitch to sew the unicorn head to the background circle. Add the horn in the same way, pinning in place and stitching down to the background.
8. Lay all hair pieces in place. You will be overlapping some parts of the felt head and horn (that’s OK!). Refer to the number key on the original template to keep the pieces in their correct order. Once you’re happy with where they are sitting, pin all the pieces in place and sew in the same way as steps 7 and 8. Some of the felt hair pieces sit edge-to-edge, so you can sew these directly together, for a neater look.
9. You now have a lovely appliquéd felt unicorn on a nice circle background! Pin it to the centre of your tote bag (being careful not to pin through to the other side – you don’t want to sew your bag shut!).
10. Using a nice bright contrasting thread, blanket stitch the appliqué to your tote bag. To make it easier to hold your work, pop one hand on the inside of the bag when you’re stitching.
11. Sit back and admire your magical felty bag! Bonus idea: This appliqué also looks cute on a sweater, or the back of a denim jacket. You could scale the pattern right down to about 10cm diameter and make a felt patch!
To see more from Cat, head over this way.
These wonderful crafty projects were brought to you by the Art Gallery of New South Wales. Visit the medieval tapestry masterpieces that are The lady and the unicorn in Sydney until June 24th – more information over here.